You will often hear, that when drawing an object, you start out by breaking it down into its most basic shapes. These basic shapes usually consist of the square, the circle, the triangle and the rectangle. And if you lift these from a 2D perspective, to a 3D perspective, you get the box (or cube), the sphere, the cone and the cylinder. In this lesson I am going to show you how to draw boxes. The other shapes will follow in future lessons.
Pretty much anything you can think of, can be constructed using these four shapes, or a combination of them. So learning these, is a task well worth your time.
First of, let me show you what I mean by going from 2D to 3D.
As you can see in the drawing beneath, I have drawn a square, a circle, a triangle and a rectangle. 2 dimensional shapes, flat on the paper. Just below, I have then transferred these into 3 dimensional shapes, by adding and changing some lines. As you can see they have now obtained a roomy quality, and this way we get the box, the sphere, the cone and the cylinder.

I have tried to make them as stylistic as possible for the sake of this lesson, since what we’re after here, is an understanding of the way the shapes are constructed. For this reason I have deliberately left out shading and shadows, which would greatly enhance the 3D effect and realism. (We’ll get to that later). But even with this added simplicity, it’s easy to see how the 3D shapes are so much more lively and engaging. This is (usually) what we’re after when we draw, so it makes a lot of sense to practice these.
Practicing the Basics
In almost anything you can imagine, that takes some level of skill work, from calisthenics to playing an instrument, you’ll hear people saying that practicing the basics is essential. It just makes everything else easier! And this is no different for drawing. Boxes alone will teach you about line work, construction, perspective and dimensions, just to name a few benefits. They’re the basis of numerous other objects, plus they’re just a lot of fun on their own!
Many Approaches
First of all, you should know that there are numerous ways to draw boxes! I’m going to show you a couple of different ways to do it. I would recommend you play around with these approaches, to find your own preference.
Box variations 1 & 2 are very good starting points, though… Because in the way you draw these, you really get a sense of the way the box is constructed. This is great for understanding the 3D nature of the box, which will help you in many other aspects of drawing further down the road.
As always, when actually drawing, I would also recommend drawing very lightly in the beginning, and adding more pressure as you find your lines.
So… Without further ado, here’s how to draw boxes.
Box Variation 1
This box is viewed directly from the front, and therefore has two visible sides in the solid form.
Step one: Simply draw a square.
- If you’re very new to drawing, don’t get discouraged if this is harder than you think. Just take your time, and make it as accurate as possible. If you have to use a ruler, you can, but I would strongly encourage you to practice doing it without one.
- Remember to draw lightly as you’ll be erasing some of the lines later.
Step Two: Draw another square, a bit smaller, a bit higher and “behind” the first one.
- For the sake of clarity in the lesson, I have drawn this second square very lightly. You don’t have to do this.
- Notice how the distance between the bottom two lines is bigger than the top two lines. It’s supposed to be like that 😉 It’s perspective, and it adds to the realism. (Look at my drawing further down the page, for an example of this)
Step Three: Now simply connect the corners, and voilà, you have a box!

Now that you have your box, you can decide how you want it to look. In the examples below, you can see how I erased certain lines to get a specific variation of the box. (Look at the small arrows for reference).
For this particular box, you basically have three options available:
- Open in front (erase the lines on the top)
- Open on top (erase the lines in the front)
- Solid box (yes, you guessed it… Erase the lines on top and in front)
And you can obviously play around with combining them. Or you could draw the whole thing upside down, so you get a view from the bottom instead, etc. etc. In fact, I highly encourage you to do stuff like that. Exploration is your friend! 😉

Box Variation 2
This box is viewed a bit from an angle, and therefore has three visible sides:
Step one: Draw a square. Angle it downwards a bit, (not too much).
Step Two: Draw another square, a bit higher, and a bit “behind” the first one.
Step Three: Connect the corners, and there it is!

For this box, you have three visible sides in front. This gives you four basic options (look at the picture below for reference).
- Open in front to the left (notice how you can see the back of the box here).
- Open in front to the right (slightly different angle, so you can’t see the back in this one).
- Open on top
- Solid Box
And again: combine them and play around with them as you like. Adventure is your friend! 😉

Box Variation 3
This one is actually similar to variation 2, as you can see. It is just a different way of drawing it.
Step One: Draw a Y
- Make sure that all three angles are greater than 90 degrees.
- You can play around with the length of the lines for different end results. A long line will obviously give a long box.
Step Two: Complete one side of the box, by drawing the two opposing sides to make a square.
- Notice how I slanted them inwards a little bit. This gives a sense of perspective, which adds some nice “character” to the box. You can actually do it a lot more than what I have done here. (Look at my drawing further down, to get an example of perspective and boxes of different shapes).
Step Three: Simply Repeat step two for the other two sides.
Obviously all the same options for a solid box or open sides, apply here. But instead of erasing, you will have to add the appropriate lines. Look at the options for Box Variation 2 for reference (the picture above).

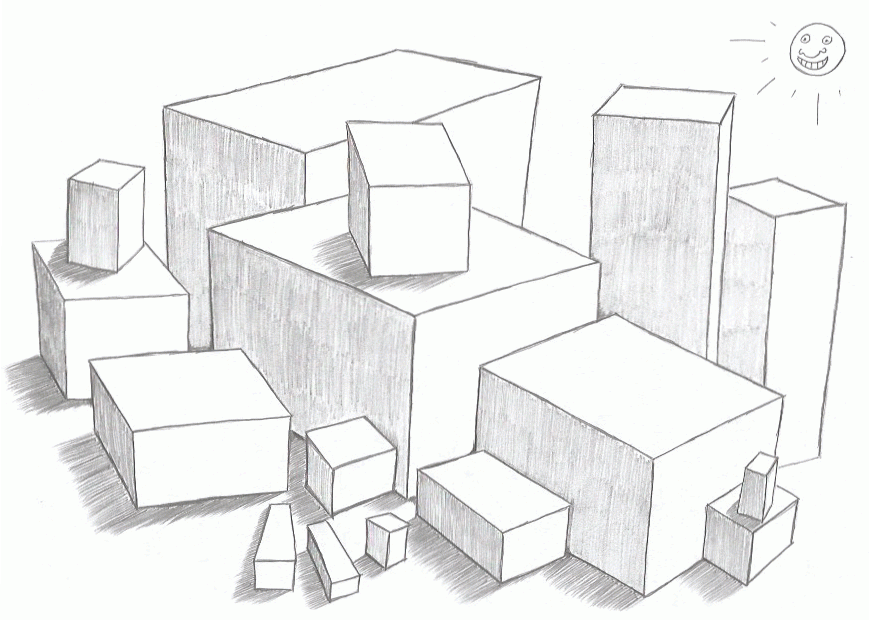
Here is a drawing I did, that I think shows the power of perspective quite nicely.

Box Variation 4
As the keen observer will notice, this next one is quite similar to variations 2 and 3. Just an alternative way of drawing it.
Step One: Draw a rhombus (also known as the diamond shape)
Step Two: Add three lines in a downwards direction
- If you draw the middle one longer than the other two, you get a sense of proportion similar to variation three above
Step Three: Add the bottom lines, to finish your masterpiece!
 And again: all the same options for a solid box or open sides apply here. But instead of erasing, you will have to add the appropriate lines. Look at the options for Box Variation 2 for reference (four pictures above).
Some people find it easier to start with one of the sides instead of the top. If this is you, that is just fine and dandy! I do it some times as well. It just depends on what the situation is. The exact same approach still applies. You just draw the next three lines coming out to the side instead. Again I absolutely encourage you to play around with the different approaches and variations! Combine them, change them, make them your own! Anarchy is your friend! 😉
So There You Have it!
That’s basically how to draw boxes…
Play around with the different methods, and find your preferred one. I would, however, recommend that you work with them all. As you’ll probably notice, different approaches fit different situations, and then it’s nice to be able to adjust accordingly.
Drawing boxes really is one of the most fundamental skills in drawing, and one that you should practice extensively. It will greatly enhance your drawing skills, and help you with a ton of other aspects of drawing. Trust me!
Once you get the hang of the basic boxes, the next logical step is to expand upon them a bit, and make them into something more tangible. Start with the basic box as I have shown you, and build from there. Make it as complex or as simple as you like.
Take a look at this drawing for some very simple beginning ideas.
Yes…I have said it before, and I’ll say it again and again: You can never draw too many boxes!
-Just remember to also think outside them, once in a while…! 😉
Thanks for checking out my stuff, and until the next lesson: Best wishes, and happy (box) drawing!
Michael
Hi Michael, drawing is definitely not my strongest point but always something I would like to work on. This has inspired me to pull out pen and paper and get back to basics. I never thought how much was involved and how many options you have with a simple box. Love it, thank you for your step by step guide. After I master this, I will look forward to the next shape.
Hi ALix,
If I manage to put some inspiration out there, then that is just awesome!
Super glad to hear it, and it certainly gets me excited to start working on the next shape! The sphere, methinks… 😉
-Yes, most people get pretty surprised, when they discover how much there is, to a simple shape like the box. The good thing is, that there’s an equal, if not greater, amount of learning involved. Once you master the box, so many other things get a whole lot easier!
I hope the steps made sense to you. If there’s anything that’s unclear, please let me know, and I’ll do my best to fix it.
Thanks for the visit, and thanks for the comment,
Michael
Hi Michael,
I had a subject in school, technical drawing. Pretty much we were dealing with this kind of drawings. You explained everything so neatly. I must say that your skill is amazing. I like your birdseye view drawing with the little guy. Keep up the great work. All the best.
Ivan
Hi Ivan,
Yes, this would definitely be categorised under the term technical drawing… Though it really is only scratching the surface of the very tip of the iceberg, LOL! 😉 But you know this, if you studied it in school.
I’m glad the explanations made sense to you, it’s not always easy to know what makes sense to others, and what doesn’t.. 😉
And thank you SO much for the kind words! I still have a LONG way to go, but that’s the point of The Drawing Journey… Learning to draw, right?!?
I do agree that the birds eye drawing is kinda cool, though. Perspective is just such an awesome thing to play around with. Really gives depth and dimension to the drawings.
Thanks for the visit, and thanks for the comment.
Best wishes,
Michael
Hi Michael- Wow, this is so great- For years I have painted but somehow I get my shaping of things a bit weird and seeing this is so great as it simplifies it for me and I am looking forward to practising what I learn here
Bookmarked and thank you
Hi Vicki.
Thank you so much for the kind words. Glad to hear that you see some value in this.
I haven’t done much painting myself, but I always heard that the basis of great painting lies in good drawing… Don’t know if this really holds true or not… It probably depends on what style you paint. 😉
Would love too see some of your work.
Anyway, if I can provide a little help, that makes me happy! And I’ll be making more lessons soon, so you’re more than welcome, to check back once in a while.
Thanks for the visit, and thanks for the comment,
All the best,
Michael
I absolutely love this – thank you! I’ve been trying to teach myself to draw but it doesn’t come naturally to me. My kids have always been excellent drawers and I think it’s because they don’t put any restraints on themselves – they just go for it and experiment. I need to take leaf out of their book! And I need to understand the basics too. This site it great.
Hi Melissa,
Thank you so much for the encouraging words!
Yes, kids just have a natural ability to throw themselves into stuff, not worrying about the outcome! I have a five year old myself, so I can absolutely relate! It’s only when we grow up and start thinking about risks and reputations, and other boring grown up stuff, we start limiting ourselves, right?!? 😉
I am 45 years old myself, and even though I have drawn a lot when I was a kid, I kinda forgot all about it for years. This site was actually born out of a desire to start learning again. You might wanna take a look at THIS POST, where I write a little bit about how too make it fun to start the learning process (sorry for the shameless plug! 😉 But I actually think it might be helpful).
And by all means check back once in a while, as I’ll be adding more beginner friendly lessons and tutorials over the coming weeks and months.
Thanks for visiting, and thanks for the comment!
All the best,
Michael
This is a really nice site you have going! I love the picture explanations included; they’re all yours, right?
I took art in school and I always found exact shapes difficult to get right, but this is a great guide for beginners you have here.
I especially like the third variation; it looks like a bird’s eye view of a city skyline! Crazy how simple lines can create such a beautiful image.
Hi Benji,
Thanks for the kind words!
Yes, the pictures are all mine. Hand drawn in paper and pencil. No rulers or templates! (The perspective drawing is drawn up in ink afterwards, though 😉 ) -And yes, these shapes are quite difficult to get right. That’s one more reason why it’s so useful too practice them.
-Birds eye of a city skyline… I hadn’t thought about it like that, but now that you mention it, I can definitely see that… 🙂 And I absolutely agree that is is remarkable how effective such simple lines can be.
Again, thank you so much for the kind words, thank you for the visit, and thank you for the comment.
All the best,
Michael
Wow, this is really good information. Very detailed and to the point. I absolutely love it. I remember when I was in high school, I used to be obsessed with these drawings. I would draw on all of my notebooks and sometimes textbooks. It was one of my favorite drawings. I’ve been busy doing other things recently and haven’t had the time to do any drawing. Your article has reminded me to get back and do some more drawing. By the way, it was a great read. I am looking forward to your next post. Thank you so much for sharing.
Hi Hong,
Thank you so much for the kind words. Of I can be an inspiration for you to pick up drawing again, that would absolutely make my day! 😉 Do you still have some of your old notebooks? It would probably be a lot of fun to get them out and have a look again.. 😉
I can SO relate to being to busy to do any drawing. My site was actually born out of a desire to pick it up again after a long hiatus. I just kept feeling like it was something I needed to do, so I was finally left with basically no choice.
Thank you so much for visiting the site, and thank you for your comment!
All the best,
Michael
Thank you for this! I am in the creative arts, and have absolutely no aptitude for perspective. This simple tutorial actually gave me that “aha!” moment, and it all clicked. Thank you again!
Hi Trixie
Fist of, sorry for being a little slow in responding. It’s been a hectic time, and a my to-do-list has been about the size of Santa’s naughty list… ?
But thank you for the kind words! It makes me super happy that I was able to help a little bit in gaining some understanding. That’s great! Thank you for the visit, and thank you for the comment! 🙂
Best wishes,
Michael
With this….I am one step closer to drawing all of my awesome creations, ideas, a-a-……….and fantasies……
Hey Peter.
First of, sorry for being so slow in responding to your comment. I have been away from the site for a while, cause… Well, life happened, you know… 😉
But having saud that, your comment makes me super happy, cause it shows me that you understand the value of the box! 😉
-And yes, it is valuable indeed. Undrestanding the box, and how to draw it well, is one of those basic drawing skills, that will set you on your path to do exactly as you put it: drawing all of your awesome creations, ideas, and yes… Fantasies.
So I wish you well on your own drawing journey, and thanks again for the comment!
Let me know if you have any questions!
Wow I like that 3 one
That’s awesome! You just go with whichever suits you best… 🙂
Best wishes… 🙂
Thank you so much for the different perspectives of drawing a box, it really inspires me to try multiple different methods until I find what works for me and as you have shown, everyone has a different way. I’m ready to get going on drawing boxes so I can move on the next shapes. Im excited that all these shapes are the base for the final product.
Hi Kelsi,
SO happy that I was able to provide a little bit of inspiration! A box is a simple construction, but trust me, it can be the basis of (almost) everything ups ever want to draw! 🙂
Thanks for the visit, best wishes, and keep drawing!
Thank you so much. I’m glad you found it to be well stated! 😉
Wow! At first I thought its hard but when I follow the step, finally I made it though its not as perfect as yours but at least I tried. Need more practice for me?
Hi Cristopher,
That’s a fantastic realisation. And it’s one of the things that applies to drawing (and so many other things in life): Take it step by step, and it ain’t that hard… 😉
Thanks for your visit, keep drawing and best wishes!
Thank you! This really helped me in School!!
Hi Evangeline,
That’s excellent! So happy that I was able to provide a little bit of help! 🙂
Thanks for the visit, keep drawing and best wishes!