Yes, as the title says, in this tutorial, I am going to show you how to draw a pencil. A super simple pencil that still looks great.
This is great little drawing to practice your drawing skills. It also has a very sharp and stylistic look to it, so if you’re looking for something that works well on a logo, an illustration or something similar, this is a good option,
If practice is your goal, then just go with the tutorial as it is here. If a logo is your goal, i would end up with a few final touches: outline in ink, and some color. I’ll make a version and add to the post one of these days. so you can see what I mean.
As you may know, I am a big fan of Easy Beginner Drawings as I think it’s very important to experience a sense of fun and achievement, as well as developing your skills, as you’re learning to draw. And one of the best ways to experience that, is through succeeding with your drawings. That way you’re basically setting yourself up for success, and this pencil drawing definitely qualifies in that aspect.
Obviously, it’s important to challenge yourself as well, but if you’re constantly going for very difficult drawings, that are way above your level, a sense of disappointment might start to sneak in, which could have your motivation suffer in the long run. The goal is to find that balance between challenging yourself, and picking doable projects. That way you’re experiencing success in your drawing journey, while still improving your skills.
The Approach: Break the Object Down to its Basic Shapes
I am going to take the systematic approach that a lot of artists swear by, of breaking the object down to its most basic shapes, and building it up from there. This is a great way to simplify new drawings, and get an overview to make the task at hand seem less daunting. As you start taking on more advanced drawings, this approach will make the process a lot simpler, so it’s a great habit to start practicing. Personally I don’t always do it that way, but as I am using it more and more, I am starting to really see the value of that approach,
But without further ado, let’s grab a pencil, and uncover how to draw a pencil!
The Actual Lesson
Remember to make your lines soft in the beginning. You’ll be erasing certain lines as they’re only meant as guidelines, And as your drawing takes shape, you clean up and enforce your lines. But if you start out with really heavy lines, your drawing could easily end up messy and full of smudges. And we don’t want that, now do we?!?
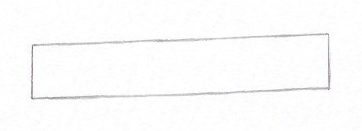
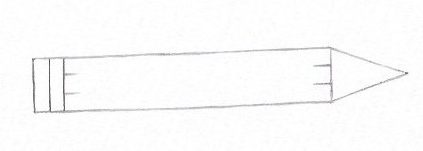
Step one:
Draw a rectangle
Don’t worry too much about it being a little crooked. Unless of course, you’re really going for the previously mentioned stylized look. In that case you might wanna consider using a ruler, and go for super straight lines.
(I obviously didn’t use one! This was on purpose, to illustrate how IMPERFECT you can be in your drawing, and still end up with a great result… 😉
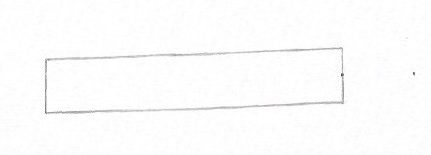
Step two:
At the very end of the rectangle, draw a guide dot to mark the middle of the line. Then use that as a reference, to draw another guide dot a bit away from the rectangle.
The reason for the first dot, is that it’s a lot easier to find the middle of a line on the actual line, than to find it when it’s floating out in midair… You obviously don’t have to do that!
Step Three:
Using your guide dots as reference, draw a triangle. This is your second basic shape.
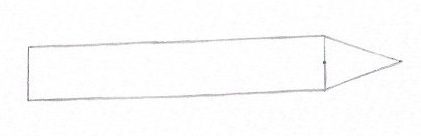
Step Four:
On the opposite end of the pencil, draw a couple of horizontal lines.
(These will become the metal band that holds the eraser in place.)
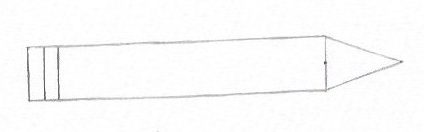
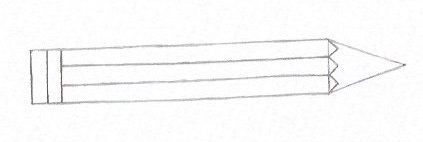
Step Five:
On the very inner part of the rectangle which makes up the body of the pencil, Divide each end into thirds, and mark them with some guide lines or guide dots.
Again, guide lines and -dots make it a lot easier to get some accuracy into your drawing. Seemingly simple tasks like dividing a small line into three parts can actually be deceptively difficult… 😉
Step Six:
Now connect these lines to make the edges going around the pencil..
You see how the pencil is slowly starting to take shape…?

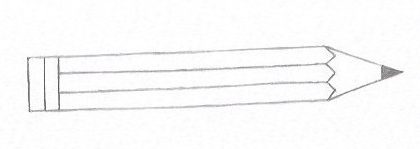
Step Seven:
For each of the three divisions of the pencil, draw small triangles at the end. You could make guide dots here as well, but I found that these triangle were so small, that it might end up more of a distraction.
Again we’re working with very simple and basic shapes. Squares and triangles only.
Step Eight:
The left horizontal sides of these newly drawn triangles are made up of the right side of the original rectangle… Erase these! (look at the picture, as that probably is a lot simpler than reading my explanation! 😉 )
And… Color the very tip of the pencil.
Step Nine:
At the bottom of the pencil, add another small rectangle shape with slightly rounded corners.
This becomes the eraser secured inside the metal band.
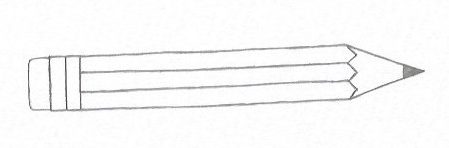
Step Ten:
For the final touch, add some shading to give your pencil a bit of a three-dimensional feel.
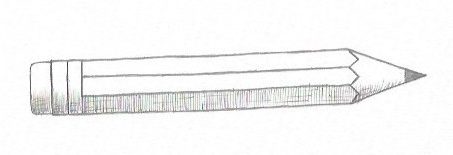
And there you have it! A simple pencil with an eraser.
As always, I would love your feed back, so please leave a comment below. Did the explanations make sense? Was I thorough enough? Too thorough, perhaps? Anything else, you’d like me to make a tutorial about?
The ten steps on how to draw a pencil were clear and precise. The drawings also assisted as it helped with the explanation of the steps. Thanks for the information, as it was helpful.
Hi Dahlia.
I’m glad you found the steps clear and precise. It’s always a challenge to figure out what to explain, and how to do it, as people understand things differently. Pictures always help, right? 😉
Thanks for your visit, and thanks for the comment.
Best wishes,
Michael
Wow buddy, this seems like a difficult task but when you break it down into simple steps like that even my 6 year old can look like a great artist. This is truly inspiring, maybe I’ll get out my old scrapbook and try some of your sketches as they seem so fun! Thanks a lot.
Hi Brandon.
Thanks for the kind words. Actually one of the premises of my site, is that drawing is a teachable and learnable skill, that anybody can get good at.
I’m so glad you found it inspiring, and made you consider getting out the old scrap book. I think everybody should draw! It’s just a great creative outlet. You’re welcome to check back into my site. I’ll be adding a lot more tutorials, and lessons over the coming weeks and months.
Plenty of inspiration for that scrapbook of yours! 😉
Thanks for the visit, and thanks for the comment.
Best wishes,
Michael
This is a very simple way to draw a pencil. I used to be a display designer that required drawing with a CAD program and it was fairly involved.
I can really relate to your exercise here and how simple it is to draw a pencil.
Everything starts with a basic step and this example shows just that. I enjoy anything that has to do with drawing! Thank you!
Hi Rob.
Yes, it is a very simple way. I am actually doing another tutorial next, which will step up the difficulty a notch. 😉
I decided to start with the simplest one, and build from there, so everybody could follow along.
I’ve never worked with CAD myself, would love to try it. For now I’m only doing it the old school way: pencil and paper! 😉
There are so many cool ways to incorporate digital aspects into drawing. It’s a whole new world, that I’m looking forward to exploring eventually.
Glad you could relate to the approach.
Thanks for your visit, and thanks for the comment.
Best wishes,
Michael