Flowers have always been a favourite subject for artists of all genres. They’re beautiful, colorful, sensual and delicate, and come in such a huge variety, that there’s always a new challenge to find, and a new way of representing this beautiful piece of nature. In this post I will show you a really simple flower drawing. It’s a fun and colorful little thing, that you can play around with, as much as you like.
This one is great for practicing your basic drawing skills, as there’s some beautiful round shapes, that really lend themselves nicely to the flow of a practicing drawing hand. There’s also ample opportunity for variations, particularly in the petals, the leaves, and of course the coloring.
It’s not a particularly realistic looking flower, but done more in a cartoon style, which, as you might know, is one of my preferences. It will work really well on a birthday card, a letter or anything else you might want to embellish with a bit of artistry.
Keep in mind, that I’ve made the instructions in a way that made the most sense in my mind, and to try to avoid any possibility of misunderstandings. But what makes sense to me, may not make sense to you, and that is of course absolutely fine! So feel free to adjust the process to your own liking. You can follow the steps accurately if you like, but you can absolutely also skip ahead, combine and change things as you go.
I would suggest, that you take your time to get the basic shapes right, and that you draw lightly in the beginning. As you find the lines you like, you can then go over them again and make them heavier. That’s the way I do it myself.
I would really appreciate any feed back, you might have. Please leave them in the comments below.
So without further ado… On to the actual lesson!
Step One: Draw an oval.
-Don’t be overly concerned about making it perfect. As a matter of fact, a little crookedness will only add to the liveliness of your final flower. This is a principle that holds true for a lot of drawings you will do… There is definitely such a thing as too perfect! 😉
 Step Two: Add some guidelines on all four sides.
This is in order to make your leaves somewhat regular in size, and get the feel of perspective in your flower, which is what gives it the 3D effect. To get that effect, it’s important to get the size of the leaves right.
As you can see, the top guideline is hovering at around the same distance above the oval, as the height of the oval itself. The bottom guideline sits around double that distance below the oval, and the guidelines to the sides, are placed at around 1 1/2 times that distance from the oval. I hope this makes sense… Thorough explanations can be a pain
 Step Three: Draw the first petal.
This is where your guidelines come into play, as you align your petal with the bottom one.
Now it kinda looks like a mushroom… 😉
 Step Four: Add two more petals. One on each side.
You’ll notice that I’ve drawn them so that it looks like they’re coming from “behind” the first petal. I’ll do this with all the successive leaves, which will add to the 3D feel.
 Step Five: More petals.
Now we’re lining up with the side guidelines. Not necessarily hitting the guidelines, though… Again, a little bit of crookedness gives life and character to your drawing. If the petals were completely symmetrical, it would look a lot more artificial.
Of course, this is an obvious place to experiment with the expression of your drawing. If you want to make it more sharp and stylized, going for more symmetry is definitely an option as well. As always: experimentation is your friend!

Step Six: Yes… More petals.
As you make your way up the sides of your flower, you’re aiming for the height that will have your petals finally aligning with the upper guideline.

Step Seven: The last petal.
This one comes in behind all the others, thus completing the feel of perspective, an important part of this simple flower drawing.

Step Eight: Adding some detail.
A simple line down the middle of each petal, adds a lot of character and fortifies the shape of each petal, while small dots in the middle gives an impression of pollen.
Small details like these greatly adds to the fullness of your final drawing.
Step Nine: Beginning the stem.
I want to add some leaves on the stem, so I’m leaving one side open.
Another approach is to simply draw the stem all the way down, and then erase the appropriate part of the line after drawing the leaf. You can experiment and find your own preference. As always, experimentation is your friend!

Step Ten: First leaf of the stem.
Almost looks like a dog’s tongue, doesn’t it…?!? 😉

Step Eleven: Finish up the first leaf of the stem.
A simple line underneath the leaf, and another across the top.
Notice how the overlapping of the two lines on the bottom of the leaf, gives it a nice perspective effect. Again this is one of those small details that makes a world of difference in your final drawing.

Step Twelve: Finish the stem and begin the second leaf.
-Another doggies’s tongue…

Step Thirteen: Complete the shape of the second leaf.
The bottom of the second leaf is completed by a line “coming out from behind the stem”
Pay attention to the bottom lines of the two leaves. Notice how the small difference in how they overlap in opposite ways, also makes the leaves stand out in opposite directions… The tiniest of details sometimes make a huge difference to a drawing. It’s actually kinda cool, once you start paying attention to it.

Step Fourteen: Finish the second leaf.
A line above and below the leaf to give it some more structure and underline the shape.
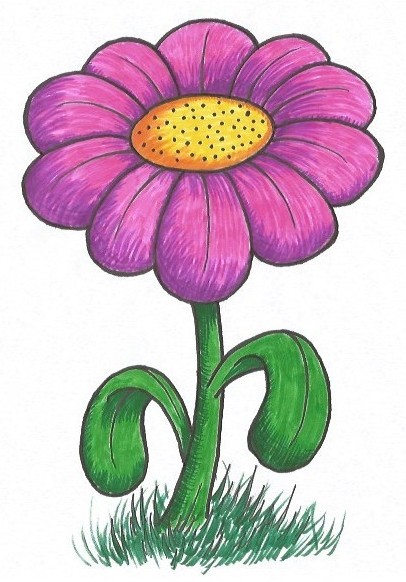
And there you have it… Your flower is ready!
now, go ahead, and garnish with a little bit of grass if you feel like it… It adds a nice touch.

Optional steps: Ink and Coloring
Now, at this point you have a few different options for this simple flower drawing.
The obvious ones are:
1) Leave it as is. Pencil drawings have a really nice aesthetic to them. Perhaps add a bit of shading.
2) Outline it in ink. Black and white… Always a really cool look!
3) Color it! Heaps of fun, and options for color variations.
Today, I am going with option number 3! I am going to color my flower.
And I am going to use some brush tip pens to do it, cause with those, I can create this nice finish that I think will work really well for it.
But first thing’s first:
Step Fifteen: Outline in ink
If I am going to color my flower, I prefer a nice clear edge. Not everybody likes it that way, though. If you prefer a softer look, going directly to the colors, might be your preferred option. This would probably give you a softer edge.
As always, I highly encourage experimentation!

Step Sixteen: First layer of color.
I am starting with a light color, and afterwards I will move on to a darker one. This is because I want to add some shading to create more depth to my drawing.
I could also choose to do some shading in ink, and then colour on top of that, but in this case I am going to do all my shading with the colors alone.
Notice the structure in the coloring. You can clearly see the strokes of the brush tip pen, particularly on the petals. I like this effect, as I think it adds a nice touch of character to the finished flower.

Step Seventeen: Second layer of color.
Some darker colors for the shading.
In this case a purple for the pink, an orange for the yellow, and a dark green for the light green. These are what I have available at this time. At some point I might invest in some better markers, that will give me better options for blending and variation. Copic Markers are obviously the créme de la créme! 😉 -But over all I think this worked out nicely.

Step Eighteen: Sharpening the edges
Very often during the coloring, the edges fade a little bit. This is mainly from overlapping and general blending.
So I like to redo the edges in black ink, to really make it pop of the page. In this case I used a Sharpie, which is a little heavier than what I normally go with. But I felt it was appropriate for this particular drawing, as it is a very simple flower drawing with large simple shapes, easily distinguishable from each other.

So There You Have It…
A simple flower drawing, ( or at least a simple one).
I hope you had some fun with it, and I hope you felt like you learned a little bit along the way as well.
As always, I would love to hear your comments. Were the instructions clear and concise? Were they detailed enough? Too detailed, perhaps? What made sense ? What didn’t? Drop me a line in the comments section below, I would truly appreciate it.
Though not a masterpiece by any measure of the word, this is still my original work. If you’d like to use it somewhere else, I would be honored! Just, please let me know, and credit me appropriately… Thanks! 🙂
All the best, and happy drawing!
Michael
What a great, simple lesson. Yes, I can do that. I think you have given some examples that many folks can have fun with. I do like drawing flowers. I used to be involved in pottery, and loved to paint flowers on my bisque ware. Then I’d put on a clear glaze for the final firing. Very fun, and quite an attractive way to decorate a pot. You have me inspired! I think I need to do some drawing.
Hi Fran.
That sounds great.
I’m a big fan of all types of creativity. Pottery certainly is no exception! 🙂
And I can definitely imagine flowers being a good item for decoration. The clear look gives a nice touch I think. With paper, pen and markers, I’m always a little limited in that aspect, but there are other mediums that can do the glazed look! Now you have ME inspired… 😉
Thanks for visiting, and thanks for the comment.
Best wishes,
Michael
Hi Mike,
I love the way that you lead people through in an easy to follow a process with a great finished product, this can inspire people to be more creative and help build their confidence in learning the art of drawing.
Dave.
Hi Dave.
Thank you so much! An easy to follow process was definitely one of the purposes, and of course the goal is to have a good finished product.
Also to inspire people to be more creative is a definite a goal of mine, and… the fact that learning the art of drawing is a teachable and learnable skill is one of the basic premises of my site…
So so if all of that, is what comes across, then I dare say: “Mission Accomplished!” 🙂
Thank you for the visit, and thank you for the comment!
Best wishes,
Michael
Nice explanation I don’t even had an idea how to start on a flower and u explained me very well thanks it didn’t came exactly but my kids said good job mom ? you did it great .Thanks for your help . ☺
Hi Julia.
Fist of, sorry for being a little slow in responding. It’s been a hectic time, and a my to-do-list has been about the size of Santa’s naughty list… ?
And thank you so much for the kind words! It makes me super happy that I was able to help you a little bit in doing some drawing. And hey… If your kids approve, it must be great…! 😉
Would you be willling to let me see you drawing, by any chance? I am always curious to see the results that people get out of my lessons. 🙂
Thanks for the visit, and thanks again for the kind words!
Best wishes, Michael
Oh my Gosh! I love it! Thank you so much for this little tutorial. Its amazing to me how easy it was to draw a little flower in a cartoonish way. I am not a good artist and I never knew really how to draw but always wanted to learn. It would be great if you will make one day you tube videos.
Hi Alona.
Thank you so much for the kind words!
And I’m really happy that you found the tutorial easy to follow along.
One of the basic premises of my site, is actually that anyone can learn to draw. It is a skill that is learnable and teachable, and not some magical talent that some people possess, and others don’t… 🙂
It’s funny that you mention Youtube videos. That is definitely an aspiration of mine. I actually have a channel. There’s not much content on it yet, but if you’d like to check it out here’s the URL: The Drawing Journey
Check back soon, I’ll be making more tutorials!
Thank you so much for the visit, and thank you for the comment!
Best wishes,
Michael
Hello there,
This is a very simple yet well-instructional article.
This will be very fun to make with my daughter – she likes to draw as well.
I love the instructions on how to make the leaves where they look like a dog’s tongue. Children love to learn and have fun at the same time.
Great post. I’ll be looking forward to more of this drawing articles.
Have a great day/eve.
Best Regards,
Che
Hi Che.
Thank you for the kind words.
Happy you find it understandable. It’s not always easy to know what makes sense to other people, when trying to explain something.
You should absolutely make this with your daughter! I made it with mine, and it’s actually in explaining the leaves to her, that I said they looked like a dog’s tongue… And it just made sense, and made her laugh, so I stuck with it. 😉
Children and adults alike can all benefit greatly from drawing. I actually have an article on some of the benefits, if you’re interested: https://thedrawingjourney.com/why-drawing-is-good-for-you-three-great-reasons take a look, you might be surprised. 🙂
Thank you so much for the visit, and thanks for the comment.
Best wishes,
Michael
I am a horrible drawer, did I mention horrible? But I did this flower. And it looks pretty good. I am a visual person but do well reading along. The way you taught this with the visual part made it very easy for me to follow. I am 61 years old and excited about my first good-looking flower drawing. WOW!
Thank you so much
Laura
Well, way to go, Laura! 🙂
I m so happy that I have been a part of your first good-looking flower drawing.
That is a big thing!
When I make a tutorial, it’s not always easy to figure out the best way to explain things. Everybody is so different in their understanding. And what makes sense to me, may not make sense to somebody else… So I am really happy that you found it easy to follow along.
-More tutorials are in the making, so check back soon! You might surprise yourself, and discover that you’re not such a horrible drawer after all… 😉
Mission accomplished, I might say!
Thank you so much for the visit, and thank you for the comment.
Best wishes,
Michael
Hi Michael!
Great simple and easy-to-understand tutorial about drawing the flower.
The tutorial is made for everyone, kids, adults, everyone who likes to draw.
Probably the other tutorials will come too.
Keep up the great work.
Wish you many drawings and creations!
Best regards!
Hi Igor.
Thank you for the kind words. Happy you found the tutorial easy to understand.
Yes, it is absolutely for everyone who likes to draw. AND everyone who would like to learn how to draw… Even just a little bit.
And yes, more tutorials are definitely coming… They do take some time to make! 😉
Thank you for the visit, and thank you for the comment.
Best wishes,
Michael
This is great my drawing skills go as far as a stick figure. I tried this and was surprised how beautiful my flower was and this was alot of fun. I can share this with my grandmother she’s very creative love this post will be watc
hing for more
Thanks
Hi Rachel.
Well no one should underestimate the almighty stick figure! They’re the basis of all figure drawing… 😉
But I’m happy that you were able to do something different as well. Getting a sense of achievement, surprising yourself, and having the experience of drawing something that you’re happy with, are fantastic ways to get motivated. Not only for more drawing, but in general. So I am very pleased that I was able to play a small part in that… And hey, if you had some fun along the way… Bonus! 🙂
And yes, by all means share this with your grandmother, or anybody else who might find it interesting.
I’ll be posting more tutorials, so check back soon.
Thanks for the visit, and thanks for the comment.
Best wishes,
Michael
I love everything about your article!
Thank you for the step by step drawings!
I have ALWAYS wanted to be good at drawing – but have not gotten there yet so I will take any tips I possibly can.
My problem is I always think that one side should be more round, or the lines not straight. You know – that kind of stuff.
Anyways, really appreciate it!
Kahlua
Hi Kahlua.
Thank you so much! That means a lot to me. 🙂
Drawing is just such a fantastic thing to do, so I can absolutely relate to your wish. That’s why I had to pick it up again after many years…
I can definitely relate to what you said about thinking that one side should be more round etc. It’s really common, and something that everybody faces. I second-guess myself ALL the time! 😉
The best advice I can give you is really just to give yourself a break, and allow yourself to be a beginner… Just draw!
Very soon you’ll realise that you’re developing an eye for shapes and symmetri, and these things will start solving themselves. Of course practice is necessary, and the more you do it, the quicker you develop.
But just draw! And you WILL improve… 🙂
I’ll be posting more free tutorials, so check back soon.
Thanks for the visit, and thanks for the comment.
Best wishes,
Michael
That’s very nice, it’s easy-to-understand tutorial!
I enjoyed doing it 🙂
Thank you for sharing this amazing tutorial
Hi Tahani.
Thank you for the kind words. Glad you enjoyed it. 🙂
Happy to share, looking forward to sharing more.
Best wishes,
Michael