
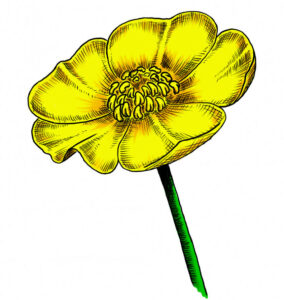
With their simple, yet delicate shapes, flowers present a nice challenge, with ample learning opportunities for artists of all levels. So let’s sharpen our pencils, and get cracking with another drawing tutorial on how to draw flowers. More specifically how to draw the humble, yet beautiful, meadow buttercup, Ranunculus acris.
Enjoy!
Tons of fun, tons of learning!
If you’ve ever visited the site before you might know that here at The Drawing Journey we’re all about learning while having fun, which usually comes down to drawing something cool, and learning general principles about drawing along the way, that we can take with us and apply to future drawings.
In this tutorial, for example, we’ll learn about construction from simple basic shapes, we’ll learn about adding depth and getting a threedimensional feeling to our drawings. And of course we’ll learn about sketching, shading, and even a little bit about coloring… All this from a simple flower!
As always, we’ll be starting with sketching the vey basic shapes and adding from there. Remember when doing this, it is helpful to be very loose in your approach, and draw from your shoulder. (Check out THIS post, and THIS YouTube video for more info on that).
And remember that drawing is fun, so enjoy the process!
Sketching
Step One:
First we want to establish the basic shape of the flower, so we loosely sketch an oval. This doesn’t have to be particularly accurate, as it’s just going to act as a guideline.
(For more info on drawing ovals, check out THIS YouTube video)

Step two:
Next we*ll add another smaller oval inside the first one. This will help us place the middle of the flower.

Step three:
Now we’ll divide the outer oval in five relatively equal sized parts. (Don’t stress accuracy here. Eyeballing it is fine ;))
(The numbers are there to illustrate the way I approach this division: I start with one division (1-2), then I make another just opposite the first one (3-4), and then finally I divide the large remaining part on the left in two (5)

Step Four:
Using the ovals and the divisions for placement, let’s sketch out two of the leaves. I like to vary the shapes of the leaves a bit, but this is obviously not necessary.
(As you can see, the lines cross over the edges of the inner oval a bit. There’ll be a center covering most of this, so I’m not too concerned with accuracy here.)

Step Five:
Let’s draw the third leaf emerging from behind the first one. (Once again we can vary the shape a bit, if we so choose.)

Step Six:
The fourth leaf is simple as it sits behind the two first ones, and is therefore easily drawn with a single curvy line.

Step Seven:
For the fifth and final leaf, let’s add a little more variation. Imperfections and variations make for a nice organic feel, and it’s a great opportunity to explore a simple way of adding the coveted 3D look to our drawing
There are two steps to this: First we draw the shape of the leaf, and we draw it all wavy and weird-looking like this:

Second we add two simple lines as shown here. And suddenly we see the leaf rising from a flat line to a 3 dimensional shape. A perfect illustration of how a few simple, well-placed details make for a big difference.

Step Eight:
To add even more depth to our drawing, we add some detail to the edges of the two closest leaves. Two simple well-placed lines, and suddenly we have a feeling that the flower has a slightly concave shape.

Step Nine:
Time to add the stem.
Using the principle of construction with basic shapes, we start out with a single line to establish placement and direction.

Step Ten:
Using this guide line for direction, we then draw the actual stem.

Step Eleven:
For the center of the flower, we want to have a bit of a convex shape. To help us establish this, it’s helpful to use the principle of construction, and draw a small hill-like shape.
.

Step Twelve:
Using this convex shape as a guide, we start adding the anthers (the small bulky things that hold the pollen).
A couple of things to keep in mind, when drawing these:
- We place them fairly randomly and not in neat rows. Too much structure will look unnatural.
- We want to draw them differently in shape and size to reflect their angle and placement.
(Oh, and don’t be surprised if this step is a little more challenging than you think… 😉 Just take your time with it!)

And now we have our basic sketch
As you can see, it looks kinda messy with the guidelines still very visible. Now, we could choose to just keep working on this with our pencil. Reiterate the lines we want to keep, and perhaps use an eraser to clean it up a litle... A lot of times this is the way I’ll work when I’m just sketching away, or just doing pencil drawings which I love.
But today we’re going with ink and color… Read on if you’re with me… 😉

Inking
Step Thirteen:
With our pencilsketch done, it’s time to do the outline in ink. We just go over our mainlines in ink. Personally I like to use fineliners, and my preferred one is the Unipin 0.3 or 0.5.
Now, for the purpose of this tutorial I am starting in blue, but normally I just go straight to black… 
Step Fourteen:
After the outline is done in ink, we erase all the pencil lines underneath. I like to use a kneaded eraser for this step, but a regular eraser works as well, just go easy, so you don’t tear the paper.
-After erasing we’re left with this. Kinda thin-looking, right..? 😉
But fear not. We will fix this. Starting with the shading.

Shading
There are many forms of shading. Today we’re going with basic crosshatching, which is one of my favourite forms of shading. You can just skip to the pictures, which I think are relatively self-explanatory, but if you want to know a little more about the thoughts behind the process, you can read the optional Introduction.
Optional Introduction to Crosshatching
So the basic principle is, as the name suggests, drawing simple lines at various length, in different angles, crossing eachother to create texture, and darker tones.
Follow along and you’ll see what I mean…
We start simple, with a series of small straight lines. We look at the shape of the object at hand, and try to follow that shape. So in this case with the flower petal, we’re drawing the first set of lines, starting from the center of the flower and pointing out towards the edge of the petal. Notice how the direction of these lines change as we move from left to right across the petal. On the far left they’re pointing diagonally towards the left, and gradually they change direction, so the ones on the far right, are pointing towards the right.
This is one of the most basic principles in crosshatching: following the shape of the object you’re drawing. (it’ll get clearer as we move along). I then do the same basic thing starting from another part of the object. In this case the edge of the petal, now pointing in towards the middle.
One more thing to notice is the actual lines. Notice how they’re pretty solid in the starting end, and then taper off, and become thinner in the opposite end. This is not strictly necessary, but it will underline the light/shadow effect as we progress, so I almost always use this type of line for my crosshatching. Physically I do this by placing my pen on the paper, and then drawing my line in a quick motion, flicking my wrist towards the end to get the tapering effect. (Perhaps you want to test this out on a seperate piece of paper to get a sense of it, before you do it on the actual drawing).
And if all of this made absolutely no sense, I don’t blame ya! Keep in mind that this all sounds very complicated, when being explained, but if you follow along with the steps, I’m sure it’ll be a lot clearer! 😉
Step Fifteen:
We place the first layer of crosshatching lines from the center of the flower petal, pointing out towards the edge, and then from the edge of the petal pointing in towards the center. We flick our wrist in drawing the lines to get our lines to taper off and add to the sense of light/dark.

Step Sixteen:
Here comes the actual crossing in crosshatching, as we place the second layer of lines in the opposite direction, crossing in over the first layer. Again applying the same principles as before, using the shape of the petal, and the same tapering line quality.
We’re also moving from the middle out towards the sides, leaving a small blank space, so we’re really getting a sense of two deepenings in the petal.

Let’s zoom in real close, to get a good look at it.
Notice the gap in the middle, which is where the light shines the brightest.
And keep in mind, that you can vary the actual nature of the hatching almost indefinately. Using smaller or larger lines, have them closer together or further apart to increase or decrease the density of the shading, vary the size of the area, add a third, fourth and fifth layer, etc. etc. The options are numerous! But today we’ll keep it simple… 😉

Step Seventeen:
We’ll need to add some shading on the bottom of the petal as well.
This time diagonal lines seem like a good choice, keeping with the principle of working with the shape of the object we’re shading.

Step Eighteen:
Taking these general principles and applying them to all the petals, we might end up with something that looks like this.

Step Nineteen:
The anthers in the middle of the flower are small bulky objects, so we’ll add some hatching here as well. But seeing as they are quite small, one layer is enough. If we start crossing over with a second layer it would just become very dark and messy. These types of small adjustments are quite common, as we always want to keep the overall aesthetic of our drawing in mind.

Step Twenty:
More shading… More crosshatching… 😉
For the stem, we start out with one layer of hatching from one side. All the way down.
Again we’re going with the shape of the object. So we do rounded hatchings following the round shape of the stem.

We want the top part of the stem darker than further down, because the head of the flower blocks the light more.
-So we do a second layer of hatching.
-This time from the other side, and only on the top part of the stem.
-Still going with the shape of the stem, so still rounded hatchings, but in the opposite direction.

We could leave it like that, or we could go with a third layer as I’ve done here, (this time down the stem) to leave the very top of the stem almost completely in the dark.

… And then we end up with something like this:

Step Twentyone:
So far we’ve left the center of our flower blank in between the anthers. This looks kind of unnatural, so let’s go ahead and darken this area a bit.
We’re just gonna stick with a simple cross hatching pattern, so let’s loosely do some hatching in between the anthers, leaving some space around the individual parts, so as not to make it too dark.

And let’s finish it off with a second layer diagonally crossing the first one. Still making sure to leave som light around the individua anthers.

And now we have our shading done
Personally I love the aesthetic of ink drawings. The sharpness of the clean black and white lines is really appealing to me, and a lot of the drawings I do, are pure ink drawings. So I could very well stop here, and just leave it as is. But today we’re gonna take it a step further, and color our buttercup.

Coloring
Now, of course the possibilities are endless when it comes to coloring. And if you’ve been a reader of the site for any length of time, you probably know that I always encourage experimenting and adding ideas and flavours of your own. So if you feel like going crazy in a frenzy of purples and pinks, I very much encourage you to do so! 🙂
But for my part, in the interest of keeping this tutorial as accessible as possible, I am keeping it very basic.
So for this flower we’re going to go with a very simple coloring palette consisting of 4 colours:
A light yellow for the flower, a darker yellow for shading.
A light green for the stem, a darker green for shading.
Step Twentythree:
First we’ll lay down a base color. Yellow for the whole head of the flower.

Step Twentyfour:
Next we’ll take a darker yellow (or an orange) and do some shading.
As you can see we’re doing it on the same area that we did the shading with ink:
In the middle between the anthers, and on the area just outside it.
I’m using a similar technique as I did with the ink pen, where I’m placing my pen, and flicking my wrist out in a fluid, swift motion to have the line taper of. I’m also making sure that the lines are not too equal in length to get a deliberate sense of randomness in the shading.
And I’m keeping the direction of the lines in the same pattern as my ink lines: pointing from the center out towards the edge of the petals.

Step Twentyfive:
Next I do the same thing in the opposite direction: Moving from the edge of the petals in towards the center of the flower.
I’m also adding some shading on the visible parts underneath the petals,

Step Twentysix:
For the stem, we also start out by laying down a base color, using a relatively light green.

Step Twentyseven:
Finally we add a darker green on the side with the shaded area, underling the shading we did with our ink pen.

And here we are at the end with our finished flower.
And to answer your question: Yes, we doubled the shading in two different ways! We could absolutely do the shading with only the colors, or with only the ink lines, which would give a different feel to the drawing. By using both techniques we get a much more dramatic effect, which is something that I personally like, but as always, I encourage you to do whatever you please. Or even try out all three versions to see how they look, and differ from eachother. This is the way to learn! 😉
Until next time, I wish you many hours of drawing pleasure!
Best wishes!

Hi Michael, reading this step by step tutorial on drawing a buttercup has made me want to pick up a pencil again! Every step is very concise and easy to follow. Even if someone has no prior experience I’m sure they could draw a beautiful buttercup! Shading is so important to give a 3d effect, and cross hatching has certainly given depth and form to the petals. I’ve used colour pencils in the past, but you’ve now inspired me to try drawing with pens!
Hi Kathy,
Thank you so much for your comment. I’m happy you found it useful and inspirational.
Colour pencils, pens, pencils… Whatever medium you fancy will do. The principles are universal and can be applied to any method you like. If you do decide to pick up some pens or other medium, I’d love to see the result! 🙂
Thanks for visiting and thanks for the comment.
Best wishes,
Michael
Very interesting article! I sure enjoyed reading it and finding out how to draw a buttercup flower from start to end. Amazing tutorial – found the step by step tutorial and illustrations very helpful.
Thank you
Hi Milionária,
Thank you so much for your comment and feed-back. I’m happy you found it helpful. If you draw something I’d live to see it. 🙂
Thanks fopr visiting.
Best wishes,
Michael
Great article and nicely explained step by step, this article just makes me take a pencil to try to draw a flower 🙂 here we can learn how to discover hidden talents, we just have to follow everything by pattern, hatching, leaves, shading, etc. .. Thank you very much and I wish you good health.
Hello Zvezdan,
Thank you so much for the comment, and I’m happy it inspired you to pick up a pencil. I think we all have hidden talents, and it’s just a question of having the courage to explore a little bit, then we might discover sides of ourselves that we never knew.
Thanks for the visit, and thanks for the comment, and I definitely wish you good health as well!
All the best!
Michael
Hi Michael,
thanks for this turtorial! I don´t find much time for it these days, but I like to draw every now and then in my free time. Will definitely try this out! Do you also have tutorials for animals?
Hi Thimo,
Hey thanks for the comment. 🙂
I understand finding time for creative endeavours is not always easy in a busy life… I have a family and a job and all the commitments that come with that myself, so trust me, I know! 😉
I find that drawing for me is an outlet, though. Something that lets me recharge my batteries, a bit like meditating. If you find the time some day, you know where to find the tutorials. And yes! I do have tutorials on animals. I’m actually updating my piranha tutorial at the moment and working on a tutorial for a seagull…
Thanks again, and best wishes!
Hi Michael! Thank you so much for this tutorial. It is the first time I actually draw a flower but it is been so long since I wanted to. Thanks for braking this into simple steps, it really helped.
Hi Evgeniya, Well in that case I am very happy that I was able to help you with it. Hope your Buttercup came out nicely, and make sure to check back for more flower tutorials coming in the near future. 🙂
Thanks again and thanks for the visit. All the best, Michael
Thanks Michael!
This tutorial provides a comprehensive step-by-step guide for drawing and shading a beautiful buttercup flower. I appreciate the detailed instructions on sketching and shading techniques, which are incredibly helpful for artists of all skill levels. The combination of ink outlines and color adds depth and dimension to the drawing, enhancing its visual appeal. Overall, it’s a fantastic resource for honing drawing skills and creating stunning floral artwork.
Hi Mason. Thank you so much for the kind words! I am so happy to hear that you find the instructions for shading helpful! I could argue that that is one of the most crucial skills to learn if you want to take your drawing from flat to full, right! 😉 Enhancing the visual appeal as you mention.
Thanks for the visit, and thank you again for the wonderful comment!
All the best! 🙂