Swords are so much fun to draw. And they also represent a great subject for creative freedom, since you can vary the difficulty, details, and style almost infinitely to suit your own taste and style.
In this lesson, I will show you how to draw swords with a very simple approach. I’m keeping it simple and relatively easy, and you should be able to follow along without too much difficulty.
Afterwards you can simply follow the same basic steps and simply change or add whatever details you feel like, to make it your own.
For this drawing, I am using a mechanical pencil 0,5 mm, and standard copy paper A4 size (8,5 x 11 inches, for the Americans). At the end I am using some fineliners for the outlining, and some simple felt tip pens for the colouring.
For an overview of the process, here is a (short) video of me drawing a different (but very similar) sword.
So if you’re ready, grab your pencil, and let’s get started!
Step One: Guidelines
Make a cross.
These are your guidelines, so make sure to draw them nice and light, as you’ll be erasing them later on
I used a ruler in this case, since I drew this particular sword big enough to fill the entire page (an A4 size), but that is absolutely not necessary. In fact, I am usually not a big fan of rulers and templates. I think drawings become much more lively when drawn in free hand. If you check out the video, you’ll see that it’s done in free hand.

Step two: Blade and handle
Using your guidelines, draw a shape for your blade, and your handle.
In this case, I’m drawing a sword that’s kind of adventure-ish in its shape, so my blade is a bit on the dramatic side! Feel free to shape your own blade anyway you want!
As you can tell, I am no longer using a ruler. From here on out, it’s completely free hand, since that’s the way I prefer it. But you should absolutely not feel bound to do it that way. If you find it exceedingly difficult to get your blade relatively straight, feel free to use a ruler! (OR… Go practice your straight lines… Go HERE for some exercises.)
(Oh, and I’m not sure what happened with the guideline to the handle, I must have cut it of during scanning 😉 )

Step three: Handguard
Still using your guidelines, draw a shape for your handguard.
I am lining the handguard up with the bottom part of the actual blade (where it meets the handle). I am also using the original guidelines to get the handguard relatively even.
(The handguard is one of the obvious places to get creative, and add your own personal touch!)

Step Four: Contour Lines
All the way down the handle I am now drawing contour lines.
These will add shape and a 3D feel to the handle. I’m still drawing lightly, as I’m still working on the basic shape of the sword, and will be drawing over these lines.
I have also erased the guidelines in the handguard, to clean that part up a little bit.

Step Five: More Shape to the Handle
Using the previously added contour lines as new guidelines, I add some more fill and shape to the handle.
What I’m doing is simple drawing small curves on top of the contour lines from step four, and continuing them in towards the middle of the handle. This also adds to the 3D effect.
I also erase the guideline in the middle of the handle, which will give a nice effect later on, when I start adding the shading.

Step six: The Pommel
Yes, that is what it is called… The knob at the end of the handle…
Bonus History lesson: The name Pommel is derived from french “pomel” which means “small apple”. Originally it was added as a means to prevent the sword from slipping out of the warrior’s hand during the fight. In certain types of big and heavy swords, it also had an effect as a counterweight, making the sword easier to control.
Now as far as drawing it. What I’m doing in this case, is actually adding two pointy shapes at the end of the handle. The smallest one first, as an extension of the handle. And then using that as a guide to add the bigger shape around it.

Step seven: The Pommel Continued
At this point, I erase the original rounded shape from my handle, and I clean up the lines a little bit.
The Pommel is also one of those places, where it’s easy to get creative.
In this case I’m keeping it very simple for clarity’s sake, but you can certainly add many details to this. You can also vary the shape and size as much as you want.

Step eight: First Details to the Blade
Fortification of the attachment to the handle.
This part is absolutely optional, I just found it fun to add… That’s one of the beauties of drawing. You can do what ever you want! 😉

Step nine: More Details to the Blade
Working off of the fortification I drew in step eight, I’m adding a shape to the middle of the blade.
I’m almost copying the shape of the actual blade.
Again, I’m keeping it simple, but this is another obvious spot to add your own artistic vision. There are lots of artists, far more skilled than me, who draw swords, and add incredibly detailed patterns and artwork to this particular part.

Step ten: Adding Sharpness to the Blade
Two diagonal lines at the end of the blade.
This way I’m adding a bit more “pointiness” to the sword, giving it a sharper look.
I also erase the guideline from the shape in the middle that I drew in step nine.

Step Eleven: Shading
As always, the shading adds so much depth to the drawing, and lifts it to another level.
Shading is something that you can always work on, and it can be done in a hundred different ways. Honestly I am not particularly good at it, and it is one of the areas, that I am working on. (I’ll be adding some tutorials specifically about this. I just feel I need to hone my own skills some more first, before I actually teach this technique).
But basically this is crosshatching. And what I am trying to do is this:
1) keep my light source coming from one direction, adding the hatching on the opposite side.
2) Adding the actual lines of the hatching in the shape of the object that I’m working on, to underline that particular shape. What this basically means is this: On the blade, the lines are straight, and on the handle and the handguard, the lines are curvy. This adds to the shape of those objects, and adds to the 3D effect of the overall drawing.

Step Twelve: Outlining in Ink
With a fineliner, I draw over every line I’ve done.
I used two different sizes for this. A 0.5 mm for the edges, and a 0,3 mm for the shading. You don’t have to do this, though. You can definitely use one size for everything.
Another option is to just leave it in pencil! Pencil drawings have a very cool aesthetic to them. In that case, I would do a similar thing. Going over the lines again, and adding some more darkness to them.
But in this case, I am actually going to colour my sword, and I feel that an outline in ink works better for that purpose.
Step Thirteen: Adding Light Reflections
To add to the life of the drawing, I am adding some areas with are going to be left white, when I colour the drawing.
I am drawing them lightly in pencil first, and then I’m outlining them with a 0,1 mm fineliner.
This is a bit of an experiment on my part. I know the effect works, but whether I’ll be able to pull it off, remains to be seen. Nothing ventured, nothing gained, right…?!? 😉
Hopefully this will look cool, when I add the colour around it afterwards.
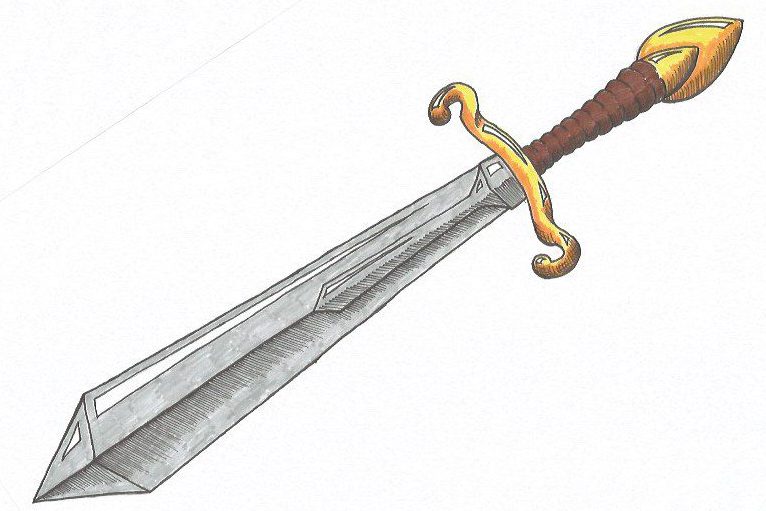
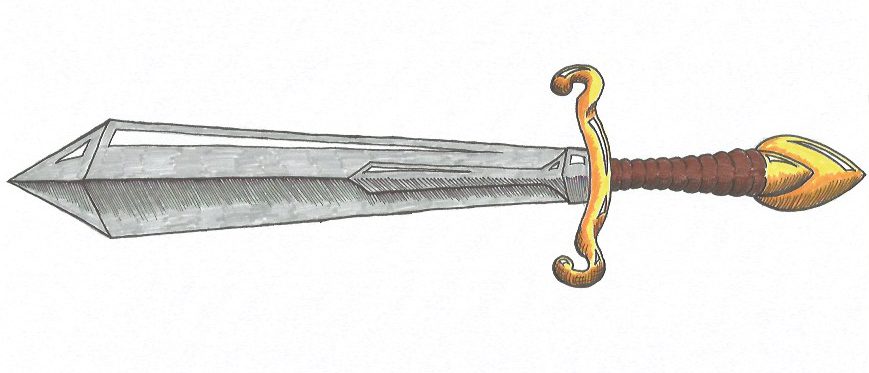
 Step Fourteen: Colour

Rounding it off.
I’m keeping a very simple colouring scheme, consisting of grey, yellow, orange and brown. And then, of course, the white areas that I drew in step thirteen, representing light reflections.
Colouring is definitely something I’ll try and do more of. I haven’t done it too much, as I’m a big fan of pencil drawings, and ink drawings. I just think they have a very cool aesthetic to them. But colouring can also add an awesome dimension. It’s just different expressions, I guess. And ultimately. I want to be able to work within as many as possible.
So There You Have it
A simple lesson on how to draw swords. I hope it made sense to you, and that you got something out of it. I also hope you’ll be drawing lots of swords, and trying your hand at different variations.
I know I learned a lot from this. So I am a happy camper. As you may or may not know, this is a journey towards learning or relearning to draw. I am learning as I go, and I am sharing what I learn with everybody who come to my sight. All of it for free!
I’ll also be sharing what I learn about resources, and materials, and any thoughts I may come up with along the way regarding these things.
So if you’re interested in learning to draw, you’ve come to the right place.
Thanks for visiting, and feel free to join me on The Drawing Journey. I’d love to hear from you, so comments are very welcome.
Have fun,
Michael
Wow, if I had looked at the end product first, I would have said that I could not draw that. You made it so simple and easy, yet fun. I do consider myself sort of artistic, and can draw unique images. But I am not very good at looking at a picture and then drawing it. You made it simple, start with the basics and then elaborate!
Thank you so much Leahrae.
Drawing in any shape or form is awesome in my opinion. And uniqueness is valuable, so hold on that! 🙂 If you want to try your hand at expanding upon that, you can find some inspiration here.
Glad you found the tutorial easy to follow, and thank you for the comment.
Best wishes,
Michael
Michael, Once again I have proven that I cannot draw…but you provided me with all the instructions and examples. The failure is mine and I will be back to try again. Even though my sword looked pretty sad, I finished and actually felt more relaxed than I have for a few days. Maybe it was the mind trying in something new.
Sanders, that is awesome! (The relaxed mind part, I mean 😉 )
Yes, drawing can definitely be very relaxing for mind and body. And I personally find it to be almost meditative as well.
And like so many other things, drawing is something that is teachable, and learnable. This is kind of the purpose of my site: For myself to relearn something that I was pretty good at once, but kind of forgot. And if I can share that with others along the way, that is just icing on the cake.
Happy you found some pleasure in it.
Thanks for visiting, and thanks for the comment.
Best wishes,
Michael
Hi Michael.
I enjoyed reading this very much.
I have never been very good at drawing, but after reading through this and seeing the sword in step by step details I actually think I could have a go at it and not do too badly. (That remains to be seen, but I’ll give it a go)
I think it could be something fun to try with my 9 year old son. We currently do airfix models together and that’s something I never did as a kid, only just started with my son in the last year. But I enjoy it and I hope we can enjoy trying to draw together too.
I will definitely come back to read more on your site.
Thank you and best wishes,
Michael
Hi Michael.
Thank you for the kind words.
And yes, any type of creativity done with the little ones is good to do. I have a five year old daughter myself, and I try to do as many things with her as possible. If it’s playing with pearls, playdough, dolls or drawing… Maybe I’ll have a go at the airfix models as well… 🙂
If you do give it a try with drawing the sword yourself, let me know how it went, and if the instructions were clear and
understandable. I’d love some feedback. Sometimes it’s surprising what other people find easy or challenging.
Thank you for visiting, and thanks for the comment.
Best wishes,
Michael
What a perfect instructional! For all my life, I’ve drawn swords with only a “general” sense of how they should look but now I can create MUCH more beautiful sketches thanks to you. I appreciate you putting this together more than you know.
Thanks!
Andrew
Thank you so much for the kind words, Andrew! I really appreciate it!
I’ll definitely be doing more of these tutorials in the future. Actually having to break it down into steps, and really being aware of what I was doing along the way, turned out to be great learning experience for myself as well… 😉
So you’re (obviously) welcome back, for other motifs in the future!
Thanks for visiting, and thanks for the comment,
Best wishes,
Michael